Step by step: from circle to granny square🧶✨


Happy day, my dear needlework friends! I hope you are all well, in good health, and feeling great.
Today, on this Monday of needles, I want to share something I enjoy very much: teaching and knitting together. We are going to learn how to start with a simple circle and turn it into a beautiful granny square, the kind I love so much and that always find a special place in my projects.🌸
The first step is to start with the basics: a circle. With our yarn, 3mm crochet hook, and a desire to create, we can get started.🧶
¡Feliz día, mis queridas amigas de las agujas! Espero que estén bien, con mucha salud y bienestar.
Hoy en este lunes de agujas quiero compartir algo que disfruto muchísimo: enseñar y tejer juntas. Vamos a aprender cómo empezar con un círculo sencillo y convertirlo en un hermoso granny, de esos que tanto me encantan y que siempre encuentran un lugar especial en mis proyectos.🌸
Lo primero es empezar con lo más básico: un círculo. Con nuestro hilo, aguja de crochet de 3mm y muchas ganas de crear a la mano, podemos comenzar.🧶

Row 1:
Make a magic ring and work 12 double crochet stitches (dc) into it. Once you have worked them, close the round with a slip stitch (sl st). That's it, you have your first circle.
This step is important because from now on everything will grow in an orderly fashion. If you count the stitches and verify that there are 12, you can be sure that your crochet will be even and will not shrink or become misshapen.
Now, starting from this circle, we will begin to play with increases and combinations of stitches that will allow us to shape it into a square. The nice thing about this part is that on each round you can choose different colors, change yarn, and let your creativity shine. I like to use leftover yarn from other projects, because that way each granny square becomes unique.🧶
Row 2🧶:
In this round, we are going to knit 2 double crochets (dc) together in each double crochet of the previous round. At the end, we will have 24 stitches. We close with a slip stitch (sl st). Here we can already see how the circle is growing evenly.
Row 3🧶:
Now the sequence will be: 2 dc in the same stitch, then 1 dc in the next stitch. And we repeat: 2 dc + 1 dc, until we finish the whole row. This helps us keep the circle flat and without waves. We close with a sl st.
Vuelta 1🧶:
Hacemos un anillo mágico y dentro de él vamos a tejer 12 puntos altos (pa). Una vez los hayamos tejido, cerramos la vuelta con un punto deslizado (pd). Así de simple tenemos nuestro primer círculo.
Este paso es importante porque de aquí en adelante todo crecerá de forma ordenada. Si cuentas los puntos y verificas que sean 12, te aseguras de que tu tejido quede parejo y no se encoja ni se deforme.
Ahora, a partir de este círculo, empezaremos a jugar con aumentos y combinaciones de puntos que nos permitirán darle forma de cuadrado. Lo bonito de esta parte es que en cada vuelta puedes elegir colores distintos, cambiar de hilo y dejar que tu creatividad se manifieste. A mí me gusta aprovechar restos de hilos de otros proyectos, porque así cada granny se vuelve único.🧶
Vuelta 2🧶:
En esta vuelta vamos a tejer 2 puntos altos (pa) juntos en cada punto alto de la vuelta anterior. Al final tendremos 24 puntos. Cerramos con un punto deslizado (pd). Aquí ya empezamos a notar cómo el círculo crece parejito.
Vuelta 3🧶:
Ahora la secuencia será: 2 pa en el mismo punto, luego 1 pa en el siguiente. Y repetimos: 2 pa + 1 pa, hasta terminar toda la vuelta. Esto nos ayuda a mantener el círculo plano y sin ondas. Cerramos con un pd.
 |  |  |
|---|
 |  |  |  |
|---|
Row 4🧶:
Here comes the most exciting part: we're going to make it into a square!
The sequence is as follows:
• Crochet 2 dc together
• Then 2 half double crochets (hdc)
• Then 3 single crochets (sc)
• Again 2 hdc
• And finally, 2 dc together in the same place.
This forms one of the corners. To mark it clearly, we crochet 2 chains and repeat the sequence in the next group of stitches. This is how we form the four sides of the square. At the end, we close with a slip stitch and we can now see our circle turned into a granny square.
Row 5🧶 and following:
From here, we continue crocheting on the base of the square. In each corner, we will always crochet 2 dc – 2 chains – 2 dc in the same space, and on the sides we continue filling with double crochets.
Each round we add will make our granny square grow, and you decide how big to make it depending on the project you have in mind.💖
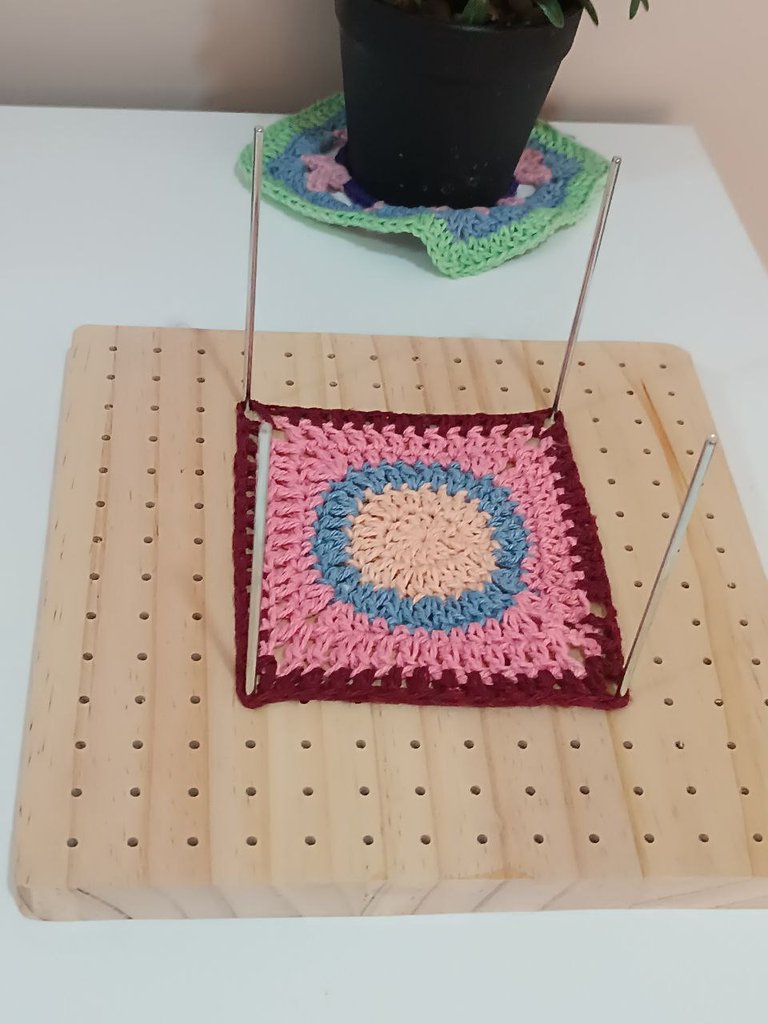
The end result is a beautiful square granny square. I crocheted two, using balls of yarn that belonged to my mom, with the intention of preserving them in these pieces full of memories. Now I will use them as coasters in my home, knowing that each one holds a little piece of her.💖🌹✨
Vuelta 4🧶:
Aquí llega lo más emocionante: ¡vamos a darle forma de cuadrado!
La secuencia es así:
• Tejemos 2 pa juntos
• Luego 2 medios puntos altos (mpa)
• Después 3 puntos bajos (pb)
• Otra vez 2 mpa
• Y, finalmente, 2 pa juntos en el mismo lugar.
Eso forma una de las esquinas. Para marcarla bien, tejemos 2 cadenas y repetimos la secuencia en el siguiente grupo de puntos. Así formamos los cuatro lados del cuadrado. Al final cerramos con un pd y ya podemos ver nuestro círculo convertido en granny.
Vuelta 5🧶 y siguientes:
Desde aquí, lo que hacemos es seguir tejiendo sobre la base del cuadrado. En cada esquina siempre vamos a tejer 2 pa – 2 cadenas – 2 pa en el mismo espacio, y en los lados continuamos rellenando con puntos altos.
Cada vuelta que agreguemos hará crecer nuestro granny, y tú decides hasta qué tamaño llevarlo según el proyecto que tengas en mente.💖
El resultado final es un hermoso granny cuadrado. Yo tejí dos, utilizando ovillos que pertenecieron a mi mamá, con la intención de conservarlos en estas piezas llenas de recuerdos. Ahora los usaré como posavasos en mi casa, sabiendo que cada uno guarda un pedacito de ella.💖🌹✨
 |  |
|---|
**
Health and well-being for all!
¡Salud y bienestar para todos!
**
Las fotos que ilustran esta publicación son de mi archivo personal, tomadas con mi celular Redmi9. El banner y el separador son mis diseños en Canva.
The photos illustrating this post are from my personal archive, taken with my Redmi9 cell phone. The banner and the divider are my designs in Canva.
Beautiful work. Love how you turned the circle into a granny square 🧶✨
Hi friend, your work is great! Greetings and happy beginning of the week
Han quedado bellísimos, me encantan, un hermoso trabajo 👍🏻
The color combination of the different yarn makes this granny so cute. Nice work and thank you for sharing
selected by @stevenson7