Strawberry Makeup 🍓✨ [ENG-ESP]


Strawberry Makeup 🍓✨ [ENG-ESP]
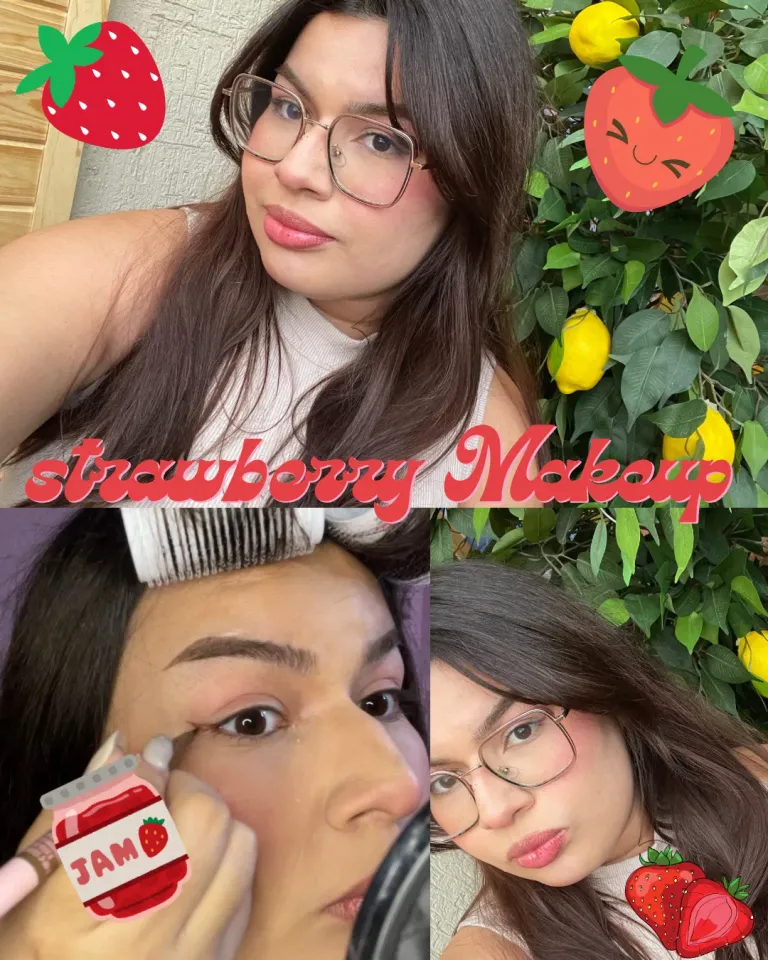
Today I want to share a makeup tutorial I’ve been dying to try for a while: the Strawberry Makeup look.
It’s a fresh, sweet, and summery look that’s super trendy right now—and the best part: it’s really easy to do!
I already had my brows done and my face well moisturized. For the base, I used a light mix of my regular foundation and snail mucin, which gives the skin a juicy, natural finish without feeling heavy.
Step by step:
- Subtle but strategic contour
This look has a very summer glow vibe, so contouring is a must. I applied contour to my face and nose to give it that natural sun-kissed effect. I also added a bit to my eyelids to create some early dimension. - Concealer only where needed
I used small amounts of concealer to brighten key areas: under the eyes, center of the forehead, and chin. I blended it out well to keep that fresh look. - Blush time!
This is where the Strawberry Makeup magic begins. I used a red cream blush (actually a creamy lipstick that’s easy to blend) and applied it to my cheeks, blending it upwards for that signature flushed look. I also dabbed the leftover product on my eyelids with a sponge for a soft, cohesive effect. - Mini liner and lashes
With a flat brush and a brown shadow (though you can also use a thin eyeliner like I did), I created a subtle line on both eyes. I finished with mascara to open up the eyes. - Fake freckles, the key detail
This step is a must! I used the same brown eyeliner I used for my eyes to draw some fake freckles on my cheeks and nose. They give that playful, natural touch that makes this look so unique. - Juicy lips
I lined my lips with a nude-pink pencil, then added a bit of the same red lipstick/blush to the center and blended it outward. To finish, I added a red gloss on top. Fresh, fruity lips!
A romantic, summery look full of life and super easy to achieve with products you probably already have. I absolutely loved the result! 💕
VERSION ESPAÑOL
Hoy quiero compartirles un tutorial de maquillaje que me moría por probar desde hace un tiempo: el Strawberry Makeup. Es un look fresco, dulce y veraniego que está súper en tendencia, y lo mejor de todo: ¡es muy fácil de hacer! Ya tenía las cejas maquilladas y el rostro bien hidratado. Para la base, usé una mezcla ligera entre mi base habitual y mi mucina de baba de caracol, que le da a la piel un acabado natural y jugoso, sin sentirse pesada.
Paso a paso:
- Contorno sutil pero estratégico Este maquillaje tiene un aire muy summer glow, así que el contorno no puede faltar. Apliqué contorno en el rostro y nariz, dándole ese efecto bronceado natural. También apliqué un poco en los párpados para darle dimensión a los ojos desde el inicio. 2. Corrector solo donde lo necesita Usé pequeñas cantidades de corrector para iluminar ciertas zonas: debajo de los ojos, centro de la frente y barbilla. Lo difuminé bien para mantener el acabado fresco.
- ¡Hora del rubor! Aquí es donde empieza la magia del Strawberry Makeup. Usé un rubor rojo en crema (en realidad, un labial cremoso fácil de difuminar) y lo apliqué en las mejillas, difuminándolo hacia arriba para ese toque sonrojado tan característico. También pasé la esponja con lo que quedaba por los párpados para un efecto armónico.
- Mini delineado y pestañas Con una brocha plana y una sombra marrón (aunque también puedes usar delineador delgado como hice yo), creé un delineado sutil en ambos ojos. Finalicé con máscara de pestañas para abrir la mirada.
- Pecas falsas, el toque clave ¡Este paso no puede faltar! Usé el mismo delineador marrón que usé para los ojos para dibujar pecas falsas en las mejillas y la nariz. Le dan ese aire juguetón y natural que hace tan especial este look.
- Labios efecto jugoso Delineé mis labios con un lápiz nude-rosado, luego apliqué un poco del mismo labial/ rubor rojo en el centro y difuminé hacia afuera. Para terminar, añadí un gloss rojo encima. ¡Labios frescos y frutales! Resultado final: Un look romántico, veraniego, lleno de vida y súper sencillo de lograr con productos que probablemente ya tienes. Sin duda, ¡me encantó el resultado!
Translated
Photos taken with my Iphone12
For the best experience view this post on Liketu