Melee Mayhem Ruleset - Tomando ventaja con Jared Scar desde la segunda línea / Taking advantage with Jared Scar from the second line [Esp/Eng]
Español
¡Saludos comunidad! El reto de esta semana es sobre una regla de batalla que permite a los monstruos con daño melee atacar desde cualquier posición, en la siguiente sección se explicará más a detalle. Por lo que tener en cuenta este aspecto en el análisis para formar nuestras estrategias, es un factor clave con un impacto considerable en el desempeño de las mismas. Es importante recordar que el tipo de ofensiva a utilizar en nuestras estrategias también dependerá del resto del conjunto de reglas presentes en la batalla.
En esta oportunidad, les explicaré cómo afronté una batalla de ranked de la liga de Plata en el formato Moderno bajo estas circunstancias, enfocando mi análisis en explicar la estrategia que utilicé con el Splinter de Vida, tomando ventaja con Jared Scar en la segunda línea de mi equipo.
La regla de batalla de esta semana es “Melee Mayhem” que combinada con la estrategia adecuada puede darnos la ventaja en nuestras batallas.

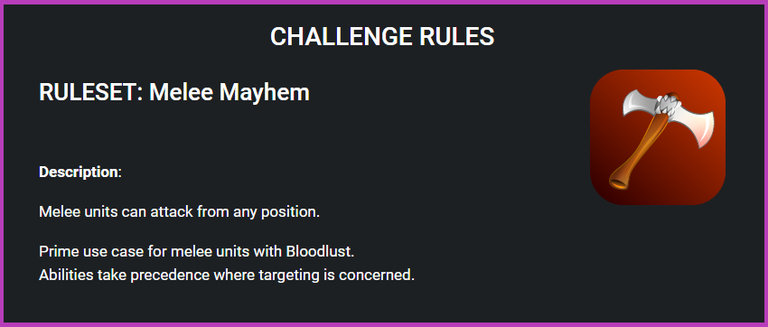
Melee Mayhem es una regla que permite a los monstruos con daño melee atacar desde cualquier posición en la batalla. Sin embargo, esto no afecta el orden o prioridad de ataque de las habilidades melee, se mantiene igual.
Entonces, tomando en cuenta lo anterior, es recomendable utilizar monstruos melee con habilidades como: “Inspire”, “Bloodlust”, “Double Strike”, “Demoralize”, “True Strike” y “Giant Killer”.
Conjunto de reglas y elección
Hablemos sobre el conjunto de reglas presentes en la batalla, este es el punto de partida para iniciar el análisis que nos llevará a la elección más adecuada para afrontar la batalla.
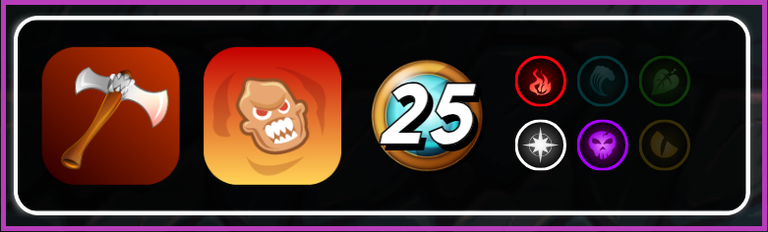
Límite de maná igual a 25 puntos. Con esta cantidad, es recomendable usar invocadores con un costo de maná de 3 o 4 puntos, de tal manera que la cantidad de puntos restante sean suficientes para elegir los monstruos adecuados.
La regla Melee Mayhem, ya la expliqué a detalle en la sección anterior. Por otra parte, la regla What Doesn´t Kill You, otorga la habilidad “Enrage” a todos los monstruos en la batalla. La cual incrementa el daño melee, y la velocidad del monstruo en un factor de 1.5 redondeado por exceso, cuando éste recibe daño físico.
Entonces, tomando en cuenta todos estos aspectos, decidí utilizar al Splinter de Vida, ya que cuenta con monstruos con buenos atributos y daño tanto melee como ranged. Asimismo, también cuenta con habilidades como: “Void Armor”, “Heal”, “Tank Heal”, “Bloodlust”, “Flying”, entre otras, y con un invocador que incrementa en 1 punto el daño ranged.
Equipo y estrategia
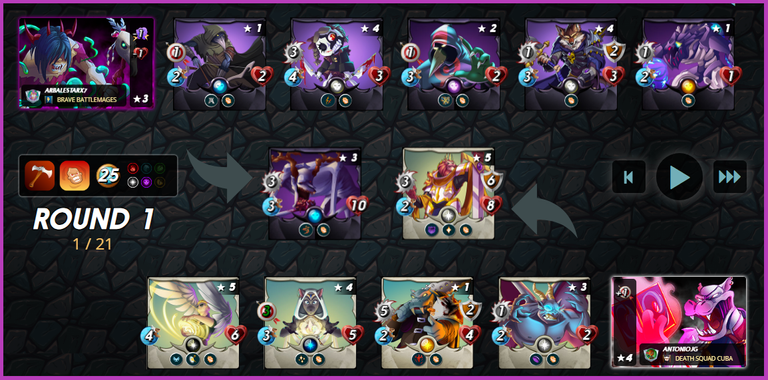
Hablemos sobre el equipo, y la estrategia que conforma. Dadas las circunstancias, era evidente el uso de cualquier tipo de daño. Es por ello que decidí usar al invocador General Sloan, ya que incrementa en 1 punto el daño ranged del equipo.
Imperial Knight fue el tanque en esta oportunidad, ya que cuenta con buenos atributos, y las habilidades: “Void Armor” y “Heal”. Las cuales permiten que el daño mágico primero golpee en su armadura, y curar una porción de su vida en cada turno, respectivamente.
Gargoya Scrapper ocupó la segunda posición con la finalidad de dar tiempo al resto del equipo en caso que el tanque caiga. Además de contribuir con su daño desde la segunda línea.
Jared Scar ocupó la tercera posición con el propósito de tomar ventaja mediante su habilidad “Bloodlust” atacando desde la segunda línea.
Venari Crystalsmith ocupó la cuarta posición con la finalidad de dar soporte al tanque mediante su habilidad “Tank Heal”, y contribuir con su daño desde la segunda línea.
Pelacor Conjurer ocupó la última posición para proteger al resto del equipo de posibles ataques “Sneak” del enemigo.
Melee Mayhem en acción
Como les mencioné anteriormente, utilizar a un invocador que incremente en 1 punto el daño ranged de nuestro equipo, es una buena opción. Ya que los monstruos ranged tienen la ventaja de no sufrir los efectos de la habilidad “Thorns”. Sin embargo, también es importante incluir habilidades de soporte que le permitan a nuestro tanque y al resto del equipo resistir lo suficiente.
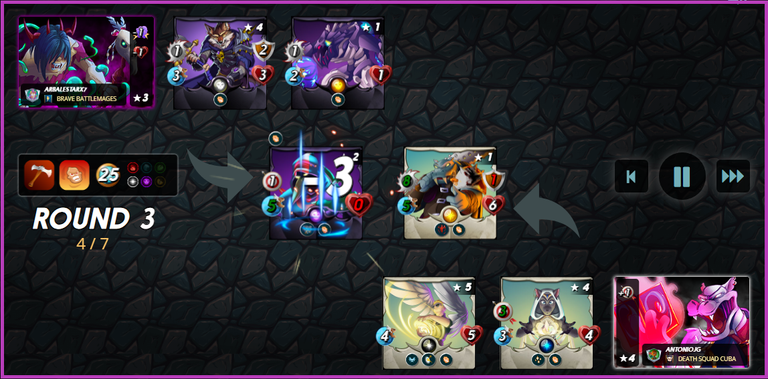
Observen como para el turno 4 de la ronda 3, el equipo enemigo estaba casi abatido. Imperial Knight logró resistir lo suficiente con el apoyo de Venari Crystalsmith y Gargoya Scrapper para dar tiempo a Jared Scar de activar su habilidad “Bloodlust”, y tomar ventaja de ello.
Si quieres ver la batalla completa, acá te dejo el enlace: CLICK PARA VER LA BATALLA
Conclusión
La estrategia planteada hizo un uso eficiente de la cantidad de maná disponible, cubriendo aspectos tales como: resistencia contra el daño enemigo, soporte del equipo, una buena ofensiva, y coherencia con el conjunto de reglas presente.
Una debilidad de esta estrategia es una ofensiva enemiga basada en un elevado daño mágico que supere la capacidad de curación de nuestro tanque, y que además incluya habilidades como: “Shatter”, “Affliction”, “Poison”, “Opportunity”, entre otras.
La diferencia entre las estrategias fue que el enemigo no utilizó un monstruo en su segunda o tercera posición que pudiera proteger al resto del equipo en caso de que su tanque muriera. Lo que resultó en una gran desventaja para él.
Para una adecuada sinergia de nuestras estrategias es importante considerar todos los aspectos involucrados, por lo que no sólo debemos enfocarnos en los atributos y habilidades a combinar. También debemos tener en cuenta la influencia de los conjuntos de reglas sobre la estrategia.
Este ha sido mi aporte al desafío semanal, ¡Espero haya sido de su agrado! ¡Saludos y hasta la próxima semana!
English
Greetings community! This week's challenge is about a battle rule that allows monsters with melee damage to attack from any position, which will be explained in more detail in the next section. So taking this aspect into account in the analysis to form our strategies, is a key factor with a considerable impact on the performance of the same. It is important to remember that the type of offensive to use in our strategies will also depend on the rest of the set of rules present in the battle.
In this opportunity, I will explain how I faced a Silver league ranked battle in the Modern format under these circumstances, focusing my analysis on explaining the strategy I used with the Life Splinter, taking advantage of Jared Scar in the second line of my team.
This week's battle rule is "Melee Mayhem" which combined with the right strategy can give us the advantage in our battles.
Melee Mayhem is a rule that allows monsters with melee damage to attack from any position in the battle. However, this does not affect the order or attack priority of melee abilities, it remains the same.
So, taking into account the above, it is advisable to use melee monsters with skills such as: "Inspire", "Bloodlust", "Double Strike", "Demoralize", "True Strike" and "Giant Killer".
Rulesets and choise
Let's talk about the set of rules present in the battle, this is the starting point to begin the analysis that will lead us to the most appropriate choice to face the battle.
Mana limit equal to 25 points. With this amount, it is advisable to use summoners with a mana cost of 3 or 4 points, so that the remaining amount of points is enough to choose the right monsters.
The Melee Mayhem rule, I already explained it in detail in the previous section. On the other hand, the What Doesn't Kill You rule grants the "Enrage" ability to all monsters in the battle. It increases the melee damage, and the speed of the monster by a factor of 1.5 rounded up, when it receives physical damage.
So, taking all these aspects into account, I decided to use the Life Splinter, since it has monsters with good attributes and both melee and ranged damage. It also has abilities such as: "Void Armor", "Heal", "Tank Heal", "Bloodlust", "Flying", among others, and a summoner that increases ranged damage by 1 point.
Team and strategy
Let's talk about the team, and the strategy it conforms. Given the circumstances, it was obvious to use any type of damage. That's why I decided to use the summoner General Sloan, since it increases the ranged damage of the team by 1 point.
Imperial Knight was the tank in this opportunity, since he has good attributes, and the abilities: "Void Armor" and "Heal". These allow the magic damage to hit his armor first, and heal a portion of his life each turn, respectively.
Gargoya Scrapper occupied the second position in order to give time to the rest of the team in case the tank falls. He also contributed with his damage from the second line.
Jared Scar took the third position in order to take advantage of his "Bloodlust" ability by attacking from the second line.
Venari Crystalsmith took the fourth position in order to support the tank with his "Tank Heal" ability, and contribute with his damage from the second line.
Pelacor Conjurer occupied the last position to protect the rest of the team from possible "Sneak" attacks from the enemy.
Melee Mayhem in action
As I mentioned before, using a summoner that increases the ranged damage of our team by 1 point is a good option. Since ranged monsters have the advantage of not suffering the effects of the "Thorns" ability. However, it is also important to include support abilities that allow our tank and the rest of the team to resist enough.
Note how by turn 4 of round 3, the enemy team was almost down. Imperial Knight managed to resist enough with the support of Venari Crystalsmith and Gargoya Scrapper to give Jared Scar time to activate his "Bloodlust" ability, and take advantage of it.
If you want to see the complete battle, here you have the link: CLICK TO WATCH THE BATTLE
Conclusion
The strategy proposed made an efficient use of the amount of mana available, covering aspects such as: resistance against enemy damage, team support, a good offensive, and coherence with the present set of rules.
A weakness of this strategy is an enemy offensive based on high magic damage that exceeds the healing capacity of our tank, and also includes abilities such as: "Shatter", "Affliction", "Poison", "Opportunity", among others.
The difference between the strategies was that the enemy did not use a monster in their second or third position that could protect the rest of the team in case their tank died. This resulted in a big disadvantage for him.
For a proper synergy of our strategies it is important to consider all the aspects involved, so we should not only focus on the attributes and skills to combine. We must also take into account the influence of the rule sets on the strategy.
This has been my contribution to the weekly challenge, I hope you enjoyed it, greetings and see you next week!
Te invito a seguirme en: / I invite you to follow me on: Twitter
Las traducciones fueron realizadas con el traductor: / Translations were done with the translator: DeepL
Todas las imágenes fueron tomadas de: / and all images were taken from: Splinterlands

https://twitter.com/AntonioJGam3r/status/1695090829084238234
Thanks for sharing! - @alokkumar121

¡Thanks! / ¡Gracias! 👍