Imperial Knight - Un excelente tanque cuando no es conveniente usar la habilidad “Taunt” / An excellent tank when it is not convenient to use the "Taunt" ability [Esp/Eng]

Español
¡Saludos comunidad! En el reto de esta semana quiero compartir con ustedes una de las estrategias en la que utilicé al monstruo Imperial Knight como tanque, combinando los Splinters Dragón y Vida en una batalla con la regla “Ferocity”, y un límite de maná de 41 puntos. Hago énfasis en esos aspectos del conjunto de reglas porque son los que me condujeron a la elaboración de la estrategia.
En esta oportunidad, les explicaré cómo afronté una batalla de ranked de la liga de Plata en el formato Moderno, enfocándome en destacar la importancia de tomar en cuenta el conjunto de reglas para formar nuestras estrategias. Adicionalmente del conjunto de habilidades que deseemos combinar.
Ya que estos aspectos son un factor clave con un impacto considerable en el desempeño de nuestras estrategias.

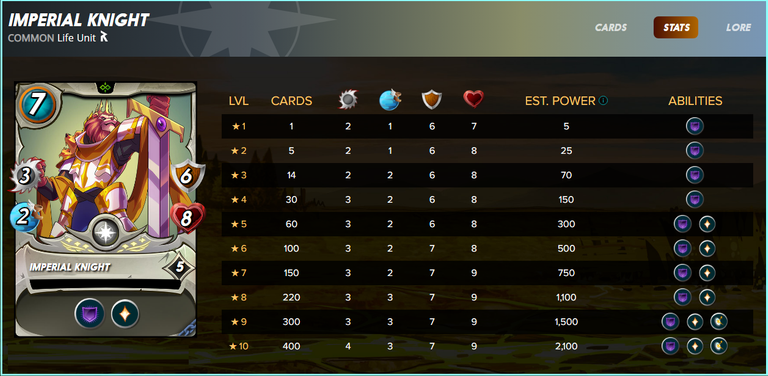
Imperial Knight es un monstruo que en su nivel 5, cuenta con buenos atributos, y aunque tiene 2 puntos de velocidad, sus habilidades: “Void Armor” y “Heal” lo compensan. Sus habilidades permiten que el daño mágico primero golpee en su armadura, y restaurar una porción de su vida, respectivamente.
Particularmente, considero que esta carta es una buena opción a utilizar en aquellas batallas cuyos conjunto de reglas implican que no es conveniente usar monstruos con la habilidad “Taunt”, ya que representaría una desventaja.
¿Por qué? Pues, es un monstruo que no recibirá daño mágico directamente a su vida. Además de ello, puede restaurar una porción de su vida cada turno, su costo de maná no es tan elevado en contraste a otros monstruos, como por ejemplo: Agor Longtail. Lo que nos deja una holgura con los puntos de maná restantes en la batalla para utilizar otros monstruos más fuertes con habilidades que se complementen mejor y conformen una estrategia sólida.
Conjunto de reglas y elección
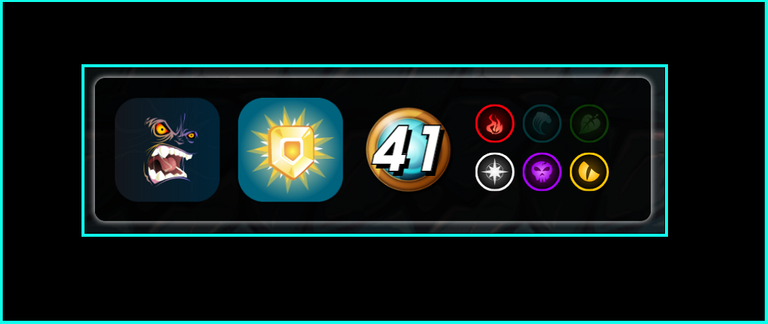
Hablemos sobre el conjunto de reglas presentes en la batalla, este es el punto de partida para iniciar el análisis que nos llevará a la elección más adecuada para afrontar la batalla.
Límite de maná igual a 41 puntos, esta cantidad nos da una ligera holgura para utilizar invocadores legendarios pero nos restringe un poco en cuanto a la cantidad de monstruos fuertes a utilizar con el maná restante. Sin embargo, otra alternativa es usar invocadores legendarios de 5 puntos de maná o menos, o invocadores raros para compensar la limitación del maná restante para la elección de los monstruos fuertes. De esta forma, podemos conformar un equipo con una relación monstruos-invocador más equilibrada que nos permita aprovechar lo mejor de cada uno, y mitigar las desventajas.
La regla Ferocity otorga la habilidad “Fury” a todos los monstruos presentes en la batalla. Esta habilidad permite hacer el doble de daño a los objetivos que posean la habilidad “Taunt”. Por otra parte, la habilidad “Holy Protection” otorga la habilidad “Divine Shield” a todos los monstruos presentes en la batalla. Debido a esto, no es conveniente incluir la habilidad “Taunt” en nuestra estrategia a pesar de que es algo común en batallas con un límite de maná alto.
Entonces, teniendo en cuenta todos estos aspectos, decidí combinar los Splinters Dragón y Vida, ya que esta combinación cuenta con un invocador legendario con un costo de maná 4. También con monstruos con buenos atributos, y habilidades como: “Void Armor”, “Heal”, “Reach”, “Double Strike”, “Repair”, “Resurrect”, “Stun”, “Affliction” y “Shatter”, las cuales se ajustan bastante bien a las circunstancias.
Equipo y estrategia
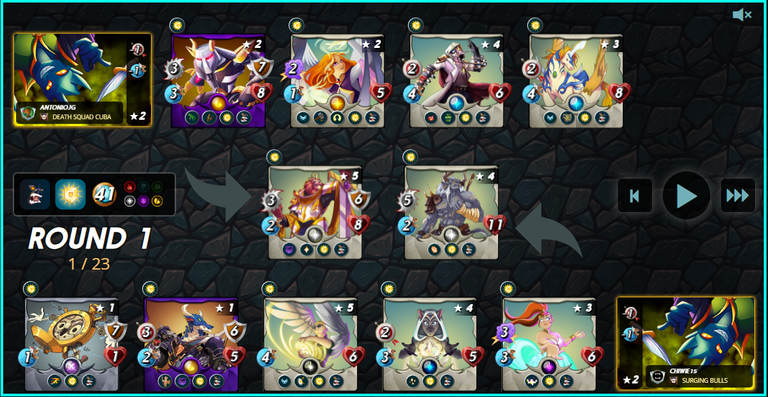
Hablemos sobre el equipo, y la estrategia que conforma. Dado a las circunstancias de la batalla, es evidente que se podía utilizar cualquier tipo de daño, por lo que es importante reducir alguno en la medida de lo posible o incluir alguna habilidad de soporte para mitigarlos. Otro factor clave, es la velocidad del equipo para poder atacar primero, y tomar ventaja en la batalla. Por estas razones decidí usar al invocador Quix The Devious, ya que tiene un costo de maná 4, y reduce en un punto el daño de rango, y la velocidad del enemigo.
Imperial Knight fue el tanque en esta oportunidad, ya que como mencioné anteriormente, sus atributos y habilidades lo hacen apto para ello, permitiéndole resistir tanto el daño físico como mágico del enemigo.
Carnage Titan ocupó la segunda posición, ya que cuenta con buenos atributos, y sus habilidades: “Reach” y “Double Strike” le permiten atacar 2 veces por turno desde esta posición.
Adelade Brightwing ocupó la tercera posición con el propósito de dar soporte al equipo mediante sus habilidades: “Repair” y “Resurrect”. Además de contribuir con su daño mágico desde la segunda fila.
Runeslinger ocupó la cuarta posición con la finalidad de tomar ventaja en la batalla una vez que aplique sus habilidades: “Stun” y “Affliction” al enemigo. Las cuales hacen que el objetivo no pueda atacar por un turno, y anula la capacidad de restaurar su vida, respectivamente. Además de contribuir con su daño tipo rango desde la segunda fila.
La última posición la ocupó War Pegasus con el propósito de tomar ventaja al destruir el escudo de los monstruos enemigos mediante su habilidad “Shatter”. Además de contribuir con su daño tipo rango desde la segunda fila. También cabe destacar que gracias a su habilidad “Flying”, y su elevada velocidad tiene más posibilidades de esquivar ataques enemigos del tipo “Sneak”.
Estrategia en acción
Tal y como les comenté anteriormente, utilizar un invocador con un coste de maná 5 o menos, y que además reduzca algún tipo de daño, y velocidad, es una buena opción. Sin embargo, también es importante incluir habilidades de soporte que le permitan a nuestro tanque y al resto del equipo resistir lo suficiente.
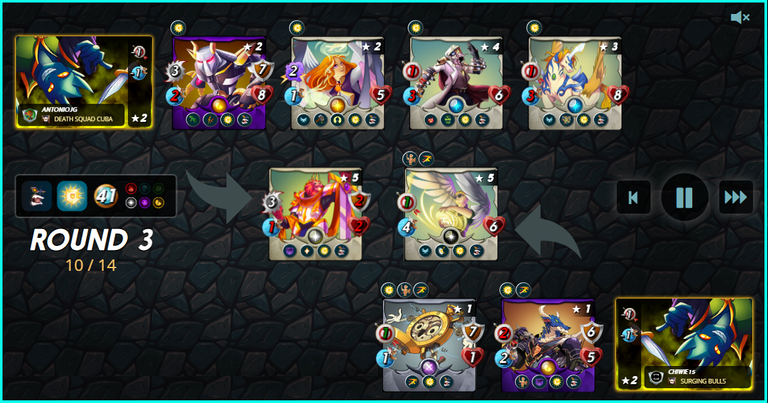
Observen como para el turno 10 de la ronda 3, el equipo enemigo estaba casi abatido. Imperial Knight había resistido bastante bien hasta este punto de la batalla, gracias a sus habilidades, y la asistencia brindada por Adelade Brightwing mediante su habilidad “Repair”. Cabe destacar que Imperial Knight aún no había muerto, por lo que aún estaba disponible la alternativa de revivirlo mediante la habilidad “Resurrect” de Adelade Brightwing.
Si quieres ver la batalla completa, acá te dejo el enlace: CLICK PARA VER LA BATALLA
Reflexiones finales
La estrategia planteada hizo un uso eficiente de la cantidad de maná disponible, cubriendo aspectos tales como: resistencia contra el daño enemigo, soporte del equipo, una buena ofensiva, y coherencia con el conjunto de reglas presente.
Una debilidad de esta estrategia es una ofensiva enemiga con un daño muy elevado que desequilibre el ritmo de la restauración del escudo y la vida del tanque. Además del uso de habilidades como: “Affliction”, “Shatter” y “Poison”, ya que la estrategia planteada no cuenta con las habilidades necesarias para cancelar tales efectos negativos.
La diferencia entre las estrategias fue que el enemigo no incluyó habilidades de soporte para aumentar la resistencia de sus monstruos en las primeras posiciones contra el daño mágico y físico. Además, tampoco incluyó habilidades para destruir mi escudo, y aunque tenía la ventaja en velocidad, estas debilidades lo llevaron a la derrota.
Para una adecuada sinergia de nuestras estrategias es importante considerar todos los aspectos involucrados, por lo que no sólo debemos enfocarnos en los atributos y habilidades a combinar. También debemos tener en cuenta la influencia de los conjuntos de reglas sobre la estrategia.
Este ha sido mi aporte al desafío semanal, ¡Espero haya sido de su agrado! ¡Saludos y hasta la próxima semana!
English
Greetings community! In this week's challenge I want to share with you one of the strategies in which I used the Imperial Knight monster as a tank, combining the Dragon and Life Splinters in a battle with the "Ferocity" rule, and a mana limit of 41 points. I emphasize those aspects of the rule set because they are the ones that led me to the elaboration of the strategy.
In this opportunity, I will explain how I faced a Silver league ranked battle in the Modern format, focusing on highlighting the importance of taking into account the rule set to form our strategies. In addition to the set of skills we want to combine.
Since these aspects are a key factor with a considerable impact on the performance of our strategies.
Imperial Knight is a monster that at level 5, has good attributes, and although he has 2 points of speed, his abilities: "Void Armor" and "Heal" make up for it. His abilities allow magic damage to first hit his armor, and restore a portion of his life, respectively.
Particularly, I consider this card a good option to use in those battles whose rule set implies that it is not convenient to use monsters with the "Taunt" ability, as it would represent a disadvantage.
Why? Well, it is a monster that will not take magic damage directly to its life. In addition, it can restore a portion of its life each turn, its mana cost is not so high in contrast to other monsters, such as for example: Agor Longtail. This leaves us some slack with the remaining mana points in the battle to use other stronger monsters with abilities that complement each other better and form a solid strategy.
Rulesets and choise
Let's talk about the set of rules present in the battle, this is the starting point to begin the analysis that will lead us to the most appropriate choice to face the battle.
Mana limit equal to 41 points, this amount gives us a slight slack to use legendary summoners but restricts us a little in terms of the amount of strong monsters to use with the remaining mana. However, another alternative is to use legendary summoners of 5 mana points or less, or rare summoners to compensate for the limitation of the remaining mana for the choice of strong monsters. In this way, we can form a team with a more balanced monsters-to-summoner ratio that allows us to take advantage of the best of each one, and mitigate the disadvantages.
The Ferocity rule grants the "Fury" ability to all monsters present in the battle. This ability allows double damage to be dealt to targets that have the "Taunt" ability. On the other hand, the "Holy Protection" skill grants the "Divine Shield" skill to all monsters present in the battle. Because of this, it is not convenient to include the "Taunt" skill in our strategy even though it is common in battles with a high mana limit.
So, taking into account all these aspects, I decided to combine the Dragon and Life Splinters, since this combination has a legendary summoner with a mana cost of 4. Also with monsters with good attributes, and skills such as: "Void Armor", "Heal", "Reach", "Double Strike", "Repair", "Resurrect", "Stun", "Affliction" and "Shatter", which fit the circumstances quite well.
Team and strategy
Let's talk about the equipment, and the strategy it conforms. Given the circumstances of the battle, it is evident that any type of damage could be used, so it is important to reduce some as much as possible or include some support skill to mitigate them. Another key factor is the speed of the team to be able to attack first, and take advantage in the battle. For these reasons I decided to use the summoner Quix The Devious, as it has a mana cost of 4, and reduces the ranged damage by one point, and the speed of the enemy.
Imperial Knight was the tank in this opportunity, since as I mentioned before, his attributes and abilities make him suitable for it, allowing him to resist both physical and magical damage from the enemy.
Carnage Titan occupied the second position, since he has good attributes, and his abilities: "Reach" and "Double Strike" allow him to attack 2 times per turn from this position.
Adelade Brightwing took the third position with the purpose of supporting the team with her abilities: "Repair" and "Resurrect". She also contributes with her magic damage from the second row.
Runeslinger occupied the fourth position with the purpose of taking advantage in the battle once he applies his abilities: "Stun" and "Affliction" to the enemy. These make the target unable to attack for one turn, and nullify the ability to restore his life, respectively. It also contributes with its range damage from the second row.
The last position was occupied by War Pegasus with the purpose of taking advantage by destroying the shield of enemy monsters through its "Shatter" ability. He also contributed with his ranged damage from the second row. It is also worth mentioning that thanks to his "Flying" ability, and his high speed, he has more chances to dodge enemy attacks of the "Sneak" type.
Strategy in action
As I mentioned before, using a summoner with a mana cost of 5 or less, and that also reduces some kind of damage and speed, is a good option. However, it is also important to include support abilities that allow our tank and the rest of the team to resist enough.
Note how by turn 10 of round 3, the enemy team was almost down. Imperial Knight had resisted quite well up to this point of the battle, thanks to its abilities, and the assistance provided by Adelade Brightwing through her "Repair" ability. It should be noted that Imperial Knight was not dead yet, so the alternative of reviving him with Adelade Brightwing's "Resurrect" skill was still available.
If you want to see the complete battle, here you have the link: CLICK TO WATCH THE BATTLE
Final thoughts
The strategy proposed made efficient use of the amount of mana available, covering aspects such as: resistance against enemy damage, team support, a good offensive, and coherence with the present set of rules.
A weakness of this strategy is an enemy offensive with very high damage that unbalances the rate of shield restoration and tank life. In addition to the use of skills such as: "Affliction", "Shatter" and "Poison", since the proposed strategy does not have the necessary skills to cancel such negative effects.
The difference between the strategies was that the enemy did not include support skills to increase the resistance of their monsters in the first positions against magical and physical damage. In addition, he also did not include skills to destroy my shield, and although he had the advantage in speed, these weaknesses led to his defeat.
For a proper synergy of our strategies it is important to consider all the aspects involved, so we should not only focus on the attributes and skills to combine. We must also take into account the influence of the rule sets on the strategy.
This has been my contribution to the weekly challenge, I hope you enjoyed it, greetings and see you next week!
Te invito a seguirme en: / I invite you to follow me on: Twitter
Las traducciones fueron realizadas con el traductor: / Translations were done with the translator: DeepL
Todas las imágenes fueron tomadas de: / and all images were taken from: Splinterlands

https://twitter.com/AntonioJGam3r/status/1681727706809942033
Has sido votado por
PROYECTO ENLACE
'Conectando Ideas y Comunidades'
PROYECTO ENLACE es un proyecto de curación de habla hispana enfocado en recompensar contenido de calidad y apoyar autores en su proceso de crecimiento en HIVE.
Creemos y apostamos por el futuro de esta gran plataforma, y estamos muy emocionados de poder hacerla crecer junto a esta comunidad. Así que te invitamos a publicar en nuestra COMUNIDAD y estar atento a todas las actividades que tenemos preparadas y que estaremos publicando en breve.
¿QUIERES AUTOMATIZAR TUS GANANCIAS DE CURACIÓN? SE PARTE DEL PROYECTO ENLACE APOYANDO A NUESTRO TRAIL EN HIVE.VOTE INGRESA AQUÍ PARA CONOCER LOS DETALLES.
¿QUIERES INVERTIR ENLACE? DESCUBRE COMO HACERLO Y GENERAR INGRESOS DE FORMA SEMANAL MEDIANTE TU DELEGACIÓN DE HP AQUÍ TE EXPLICAMOS COMO.
Te invitamos a participar en nuestro servidor de Discord: https://discord.gg/3S9y7BbWfS
Atentamente
EQUIPO ENLACE 2023
Thanks for sharing! - @alokkumar121

¡Thanks! / ¡Gracias!
Very cool battle report. I'm getting back into SL myself after a long hiatus and to read battle reports is a good way to get into the groove :).
I´m glad that you have liked the post, i share them every week, you feel free to read them. Thanks for your comment :)