Heavy Hitters Ruleset - Aprovechando al máximo el potencial de la habilidad “Stun” / Making the most of the potential of the "Stun" ability.
Español
¡Saludos comunidad! El reto de esta semana es sobre una regla de batalla que nos da la posibilidad de que la ofensiva de nuestras estrategias duplique su daño. Por lo que tener en cuenta este aspecto en el análisis para formar nuestras estrategias, es un factor clave con un impacto considerable en el desempeño de las mismas. Es importante recordar que el tipo de ofensiva a utilizar en nuestras estrategias también dependerá del resto del conjunto de reglas presentes en la batalla.
En esta oportunidad les explicaré cómo afronté una batalla de brawl bajo estas circunstancias en la liga de Plata. Cabe destacar que juego en la liga de Plata en el formato Moderno, por lo que mis análisis están enfocados en ese formato. Sin embargo, aunque la riña que juego en las batallas de brawl está en el formato Salvaje, esto no afecta mi desempeño. De hecho, lo que hago es complementar la colección que utilizo con algunas cartas que considero necesarias del formato Salvaje, y de esta forma alcanzo el desempeño deseado.
La regla de batalla de esta semana es “Heavy Hitters” que combinada con la estrategia adecuada puede darnos la ventaja en nuestras batallas.

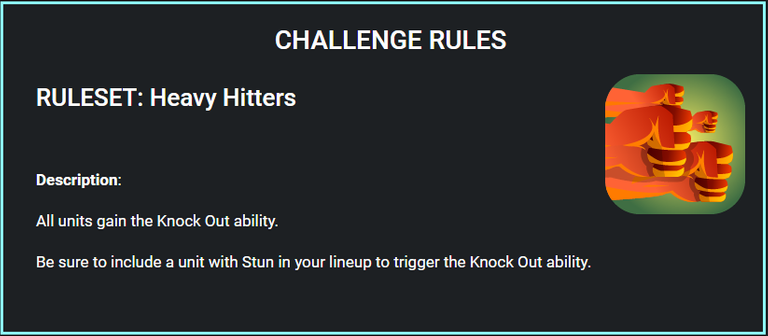
Heavy Hitters es una regla de batalla que otorga a todos los monstruos la habilidad “Knock Out”. La habilidad “Knock Out” permite hacer el doble de daño a un objetivo que se encuentre bajo el efecto de la habilidad “Stun”. Esta es la razón por la cual les comenté anteriormente que esta regla de batalla da la posibilidad de duplicar el daño de nuestra ofensiva.
Es interesante como esta regla de batalla expande la funcionalidad de la habilidad “Stun” que de por sí, ya es bastante buena. La habilidad “Stun” tiene un 50 % de chance para activarse, y una vez que se activa, su objetivo pierde su siguiente turno, lo cuál es excelente pero bajo estas circunstancias, el objetivo bajo el efecto del “Stun”, también recibirá el doble del daño, lo que representa una gran ventaja en la batalla.
Debido a esto, surge la importancia de incluir monstruos con la habilidad “Stun” en nuestras estrategias. Asimismo, incluir monstruos con las habilidades: “Double Strike” y “Recharge” también son una excelente opción. Ya que nos permitiría aumentar el factor multiplicativo del daño para cada habilidad, siendo un x4 en el caso de “Double Strike”, y un x6 en el caso de “Recharge”. Me gustaría resaltar que este análisis es el producto de mi experiencia jugando, por lo que no es una regla general, mi intención es que sirva de guía para ustedes, y les ayude en la elaboración de sus estrategias para mejorar sus resultados en la medida de lo posible.
Conjuntos de reglas y elección
Hablemos sobre el conjunto de reglas presentes en la batalla, este es el punto de partida para iniciar el análisis que nos llevará a la elección más adecuada para afrontar la batalla.
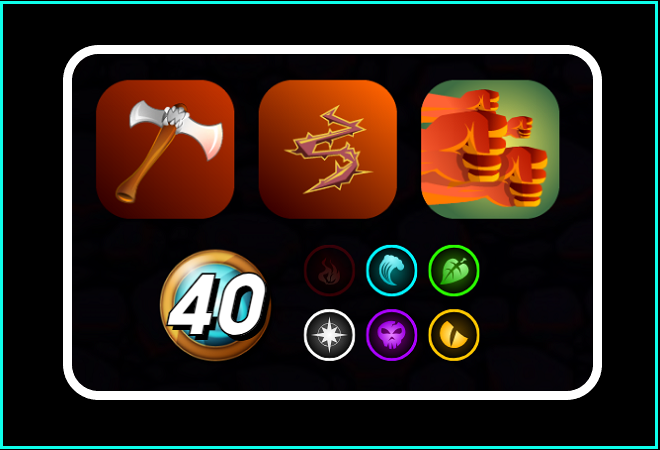
Límite de maná igual a 40 puntos, esta cantidad nos da una ligera holgura para utilizar invocadores legendarios pero nos restringe un poco en cuanto a la cantidad de monstruos fuertes a utilizar con el maná restante. Sin embargo, otra alternativa es usar invocadores raros para compensar la limitación del maná restante para la elección de los monstruos fuertes. De esta forma, podemos conformar un equipo con una relación monstruos - invocador más equilibrada que nos permita aprovechar lo mejor de cada uno, y mitigar las desventajas.
La regla Melee Mayhem permite que los monstruos con daño físico puedan atacar desde cualquier posición de la segunda fila de nuestro equipo. Lo cual nos da la posibilidad de aprovechar el potencial de aquellas cartas con daño físico que no cuentan con las habilidades: “Reach”, “Sneak” y “Opportunity” para atacar desde la segunda fila. Sin embargo, debido a la presencia de la regla “Briar Patch”, usar monstruos con daño físico no es la mejor opción, ya que representaría una desventaja porque esta regla otorga a todos los monstruos en la batalla la habilidad “Thorns”, la cual hace 2 puntos de daño físico cuando un monstruo recibe daño físico. Y con respecto a la regla Heavy Hitters, los detalles ya se explicaron en la sección anterior.
Entonces, teniendo en cuenta todos estos factores, decidí usar al Splinter de Agua, ya que cuenta con un invocador raro que reduce el daño mágico. También cuenta con monstruos con buenos atributos, un elevado daño mágico y de rango, y habilidades como: “Void”, “Phase”, “Tank Heal”, “Strengthen”, “Stun”, “Slow” y “Double Strike”, las cuales se ajustan bastante bien a las circunstancias.
Equipo y estrategia
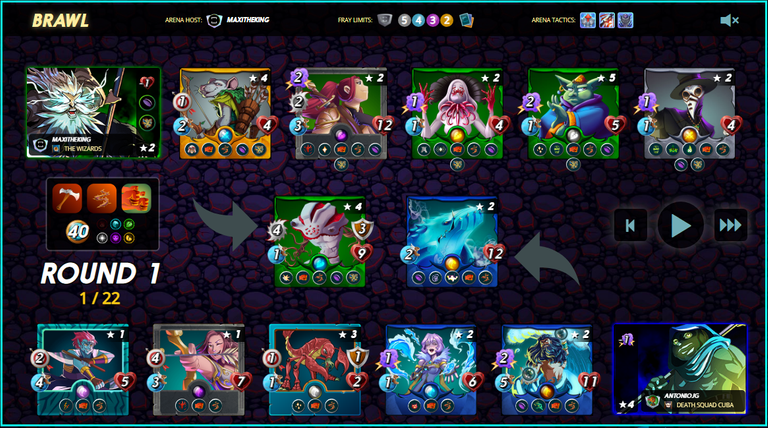
Hablemos sobre el equipo, y la estrategia que conforma. Dado a las circunstancias de la batalla, es evidente que el uso de daño mágico era la mejor opción. Por lo que elegí a Bortus como invocador, ya que cuenta con un coste de maná 3, y reduce el daño mágico del equipo enemigo en 1 punto.
Baakjira fue el tanque en esta oportunidad, ya que cuenta con buenos atributos, y las habilidades: “Void”, “Slow” y “Strengthen”. Las cuales le permiten resistir más el daño mágico, disminuir la velocidad del enemigo para aumentar la posibilidad de que podamos atacar primero en la batalla, e incrementar en un punto la vida del equipo. Lo que representa una gran ventaja.
Djinn Oshannus ocupó la segunda posición, ya que cuenta con buenos atributos, y las habilidades: “Void” y “Phase”. Las cuales son ideales para resistir, y evadir el daño mágico. También, es importante resaltar que su elevada velocidad le permite esquivar ataques con daño físico.
Water Caller ocupó la tercera posición, cuenta con atributos promedio, y su daño mágico es bajo pero lo importante de su participación en la batalla, es su habilidad “Stun”. La cual permitirá que nuestro equipo pueda aprovechar el potencial de la regla “Heavy Hitters”.
Crustacean King ocupó la cuarta posición, cuenta con atributos bajos, 1 punto de daño tipo rango pero posee la habilidad “Tank Heal”. La cual permite dar soporte al tanque, curando sus puntos de vida. Esta carta me parece una mejor opción para las batallas de Brawl en contraste a Merdaali Guardian, ya que puede hacer 1 punto de daño.
Edith Emberstar ocupó la quinta posición, cuenta con buenos atributos, 4 puntos de daño tipo rango, y la habilidad “Bloodlust”. Es una excelente opción para aprovechar el momento cuando las condiciones para activar la regla “Heavy Hitters” estén completas, y hacer un buen daño al enemigo.
Axemaster ocupó la última posición, cuenta con buenos atributos, 2 puntos de daño tipo rango, y la habilidad “Double Strike”. La cual le permite atacar 2 veces en un turno. También es una excelente opción para aprovechar el momento cuando las condiciones para activar la regla “Heavy Hitters” estén completas, y hacer un buen daño al enemigo pero con multiplicador de 4x.
Entonces, como pueden observar con la estrategia planteada se hizo un uso eficiente de la cantidad de maná disponible, cubriendo aspectos tales como: resistencia contra el daño enemigo, soporte del equipo, una buena ofensiva, y coherencia con el conjunto de reglas presente.
Heavy Hitters en acción
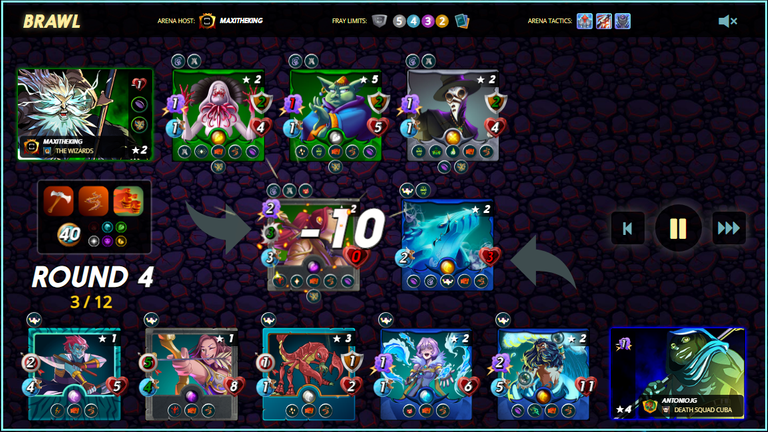
Tal y como les comenté anteriormente, usar un invocador legendario en estas circunstancias no necesariamente garantiza la ventaja. Observen como para el turno 3 de la ronda 4, el equipo enemigo estaba casi abatido. Mientras que mi equipo aún estaba completo, y aunque Baakjira posiblemente estaba próximo a caer, Djinn Oshannus tomaría su lugar para afrontar al resto del equipo enemigo sin muchos problemas.
Por otra parte, Quora Towershead, el monstruo más fuerte del equipo enemigo, la cual hasta se encontraba bajo el efecto de la habilidad “Martyr” pero también bajo el efecto de la habilidad “Stun”. Fue abatida por Edith Emberstar mediante un ataque con el daño duplicado gracias a la regla “Heavy Hitters”, haciendo un total de 10 puntos de daño. Después de esto, el rumbo de la batalla quedó más que definido.
Si quieres ver la batalla completa, acá te dejo el enlace: CLICK PARA VER LA BATALLA
Reflexiones finales
La estrategia funcionó bastante bien, cada carta cumplió su función de acuerdo a lo explicado anteriormente, permitiendo aprovechar el potencial del conjunto de reglas presente.
Una debilidad de esta estrategia es una ofensiva enemiga basada en sólo daño tipo rango que concentra la mayoría de sus ataques en el tanque, ya que mi equipo no cuenta con escudo.
La diferencia entre las estrategias fue que el enemigo usó muchos monstruos con atributos bajos, y poco daño mágico en su segunda fila. Esto se debe porque como usó un invocador legendario, el maná restante no le dejó mucho holgura para poder usar mejores monstruos. Además, usó un monstruo con daño físico como tanque a pesar de la presencia de la regla “Briar Patch”, y tampoco incluyó un monstruo con la habilidad “Stun”en su equipo, lo que le impidió aprovechar la regla “Heavy Hitters”.
Para una adecuada sinergia de nuestras estrategias es importante considerar todos los aspectos involucrados, por lo que no sólo debemos enfocarnos en los atributos y habilidades a combinar. También debemos tener en cuenta la influencia de los conjuntos de reglas sobre la estrategia.
Este ha sido mi aporte al desafío semanal, ¡Espero haya sido de su agrado! ¡Saludos y hasta la próxima semana!
English
Greetings community! This week's challenge is about a battle rule that gives us the possibility that the offensive of our strategies doubles their damage. So taking into account this aspect in the analysis to form our strategies, is a key factor with a considerable impact on the performance of the same. It is important to remember that the type of offensive to use in our strategies will also depend on the rest of the set of rules present in the battle.
In this opportunity I will explain how I faced a brawl battle under these circumstances in the Silver league. It should be noted that I play in the Silver league in the Modern format, so my analysis is focused on that format. However, although the brawl I play in brawl battles is in the Wild format, this does not affect my performance. In fact, what I do is to complement the set I use with some cards that I consider necessary from the Wild format, and in this way I achieve the desired performance.
This week's battle rule is "Heavy Hitters" which combined with the right strategy can give us the advantage in our battles.
Heavy Hitters is a battle rule that grants all monsters the ability "Knock Out". The "Knock Out" ability allows you to do double damage to a target that is under the effect of the "Stun" ability. This is the reason why I told you earlier that this battle rule gives the possibility to double the damage of our offensive.
It is interesting how this battle rule expands the functionality of the "Stun" skill, which is already quite good. The "Stun" ability has a 50% chance to activate, and once it is activated, its target loses its next turn, which is excellent, but under these circumstances, the target under the effect of the "Stun" will also receive double damage, which represents a great advantage in battle.
Because of this, it is important to include monsters with the "Stun" ability in our strategies. Likewise, including monsters with the "Double Strike" and "Recharge" abilities are also an excellent option. Since it would allow us to increase the multiplicative factor of damage for each skill, being x4 in the case of "Double Strike", and x6 in the case of "Recharge". I would like to emphasize that this analysis is the product of my experience playing, so it is not a general rule, my intention is that it serves as a guide for you, and help you in developing your strategies to improve your results as far as possible.
Rulesets and choise
Let's talk about the set of rules present in the battle, this is the starting point to begin the analysis that will lead us to the most appropriate choice to face the battle.
Mana limit equal to 40 points, this amount gives us a slight slack to use legendary summoners but restricts us a bit in terms of the amount of strong monsters to use with the remaining mana. However, another alternative is to use rare summoners to compensate for the limitation of the remaining mana for the choice of strong monsters. In this way, we can form a team with a more balanced monsters - summoner ratio that allows us to take advantage of the best of each one, and mitigate the disadvantages.
The Melee Mayhem rule allows monsters with physical damage to attack from any position in the second row of our team. This gives us the possibility to take advantage of the potential of those cards with physical damage that do not have the abilities: "Reach", "Sneak" and "Opportunity" to attack from the second row. However, due to the presence of the "Briar Patch" rule, using monsters with physical damage is not the best option, as it would represent a disadvantage because this rule grants all monsters in the battle the "Thorns" ability, which does 2 points of physical damage when a monster receives physical damage. And regarding the Heavy Hitters rule, the details were already explained in the previous section.
So, taking all these factors into account, I decided to use the Water Splinter, since it has a rare summoner that reduces magic damage. It also has monsters with good attributes, high magic and ranged damage, and skills such as: "Void", "Phase", "Tank Heal", "Strengthen", "Stun", "Slow" and "Double Strike", which fit the circumstances quite well.
Team and strategy
Let's talk about the team, and the strategy it conforms. Given the circumstances of the battle, it is evident that the use of magic damage was the best option. So I chose Bortus as the summoner, since he has a mana cost of 3, and reduces the enemy team's magic damage by 1 point.
Baakjira was the tank in this opportunity, since she has good attributes, and the abilities: "Void", "Slow" and "Strengthen". These allow him to resist magic damage more, slow down the enemy's speed to increase the possibility that we can attack first in the battle, and increase the team's life by one point. This is a great advantage.
Djinn Oshannus occupied the second position, since he has good attributes, and the abilities: "Void" and "Phase". These are ideal for resisting and evading magic damage. It is also important to highlight that its high speed allows it to dodge attacks with physical damage.
Water Caller occupied the third position, it has average attributes, and its magic damage is low, but the important thing about its participation in the battle is its "Stun" ability. This will allow our team to take advantage of the potential of the "Heavy Hitters" rule.
Crustacean King occupied the fourth position, has low attributes, 1 point of range damage but has the ability "Tank Heal". Which allows to support the tank, healing its life points. This card seems to me a better option for Brawl battles in contrast to Merdaali Guardian, as it can do 1 point of damage.
Edith Emberstar took the fifth position, has good attributes, 4 points of ranged damage, and the ability "Bloodlust". She is an excellent choice to take advantage of the moment when the conditions to activate the "Heavy Hitters" rule are complete, and do good damage to the enemy.
Axemaster occupied the last position, has good attributes, 2 points of ranged damage, and the ability "Double Strike". Which allows him to attack 2 times in one turn. It is also an excellent option to take advantage of the moment when the conditions to activate the "Heavy Hitters" rule are complete, and do good damage to the enemy but with a 4x multiplier.
So, as you can see with the proposed strategy we made an efficient use of the amount of mana available, covering aspects such as: resistance against enemy damage, team support, a good offensive, and coherence with the present set of rules.
Heavy Hitters in action
As I mentioned earlier, using a legendary summoner in these circumstances does not necessarily guarantee the advantage. Notice how by turn 3 of round 4, the enemy team was almost down. While my team was still complete, and although Baakjira was possibly close to fall, Djinn Oshannus would take his place to face the rest of the enemy team without much trouble.
On the other hand, Quora Towershead, the strongest monster of the enemy team, who was even under the effect of the "Martyr" skill but also under the effect of the "Stun" skill. She was shot down by Edith Emberstar by an attack with the damage doubled thanks to the "Heavy Hitters" rule, doing a total of 10 points of damage. After this, the course of the battle was more than defined.
If you want to see the complete battle, here you have the link: CLICK TO WATCH THE BATTLE
Final thoughts
The strategy worked quite well, each card fulfilled its function as explained above, allowing to take advantage of the potential of the ruleset present.
A weakness of this strategy is an enemy offensive based on only ranged damage that concentrates most of its attacks on the tank, since my team does not have a shield.
The difference between the strategies was that the enemy used many monsters with low attributes, and little magic damage in his second row. This is because as he used a legendary summoner, the remaining mana didn't leave him much room to use better monsters. In addition, he used a monster with physical damage as a tank despite the presence of the "Briar Patch" rule, and also did not include a monster with the "Stun" ability in his team, which prevented him from taking advantage of the "Heavy Hitters" rule.
For a proper synergy of our strategies it is important to consider all the aspects involved, so we should not only focus on the attributes and skills to combine. We must also take into account the influence of the rule sets on the strategy.
This has been my contribution to the weekly challenge, I hope you enjoyed it, greetings and see you next week!
Te invito a seguirme en: / I invite you to follow me on: Twitter
Las traducciones fueron realizadas con el traductor: DeepL / Translations were done with the translator: DeepL
Todas las imágenes fueron tomadas de: / and all images were taken from: Splinterlands
¡Gracias por leerme! / Thanks for reading me!

https://twitter.com/AntonioJGam3r/status/1680298464159170560
Thanks for sharing! - @alokkumar121

¡Thanks! / ¡Gracias! 👍